How to Track College Application Deadlines
Build a reliable deadline system with official college sources, required materials, personal target dates, and a final submission check.
If your application plan lives in three different notes, a school website tab, and your memory, a deadline is easy to miss. Build one source of truth for every college, then give yourself time to finish before the official submission window closes.
Start With The Official Deadline
Do not begin with a generic list that says every college is due on the same day. Colleges choose their own admission plans and deadlines. Common App’s first-year application guide directs students to each college’s requirements, including deadlines, testing policies, recommendations, and writing supplements.
For each college, record the application plan—such as Early Action, Early Decision, Regular Decision, or rolling admission—and the term you are applying for. Then open the college’s official admissions page and confirm the date there. A college’s own page is the final check when a third-party list, search result, or old screenshot disagrees.
Some schools use their own application system or have program-specific dates. The University of California’s first-year deadlines, for example, are published as a UC-wide filing period rather than a Common App deadline. Treat that as a reminder to check the application system and campus rules for every school on your list.
Record More Than A Date
A useful tracker answers “What is due, when, and how do I know it is complete?” Create one row per college and include:
- College and campus
- Application plan and entry term
- Official application deadline
- Time zone or local-time rule
- Application platform and fee or fee-waiver task
- Personal target date
- Required essays, recommendations, transcript, testing, portfolio, or other materials
- Submission status and confirmation location
Common App’s deadline support guidance says the deadline is 11:59 p.m. on the deadline date in the applicant’s local time zone, while timestamps are recorded in Eastern Standard Time. Even with that guidance, leave margin: confirm the school’s current instructions and submit before the last evening whenever possible.
Use A Five-Step Tracking System
The simplest reliable system is one you update after every application session.
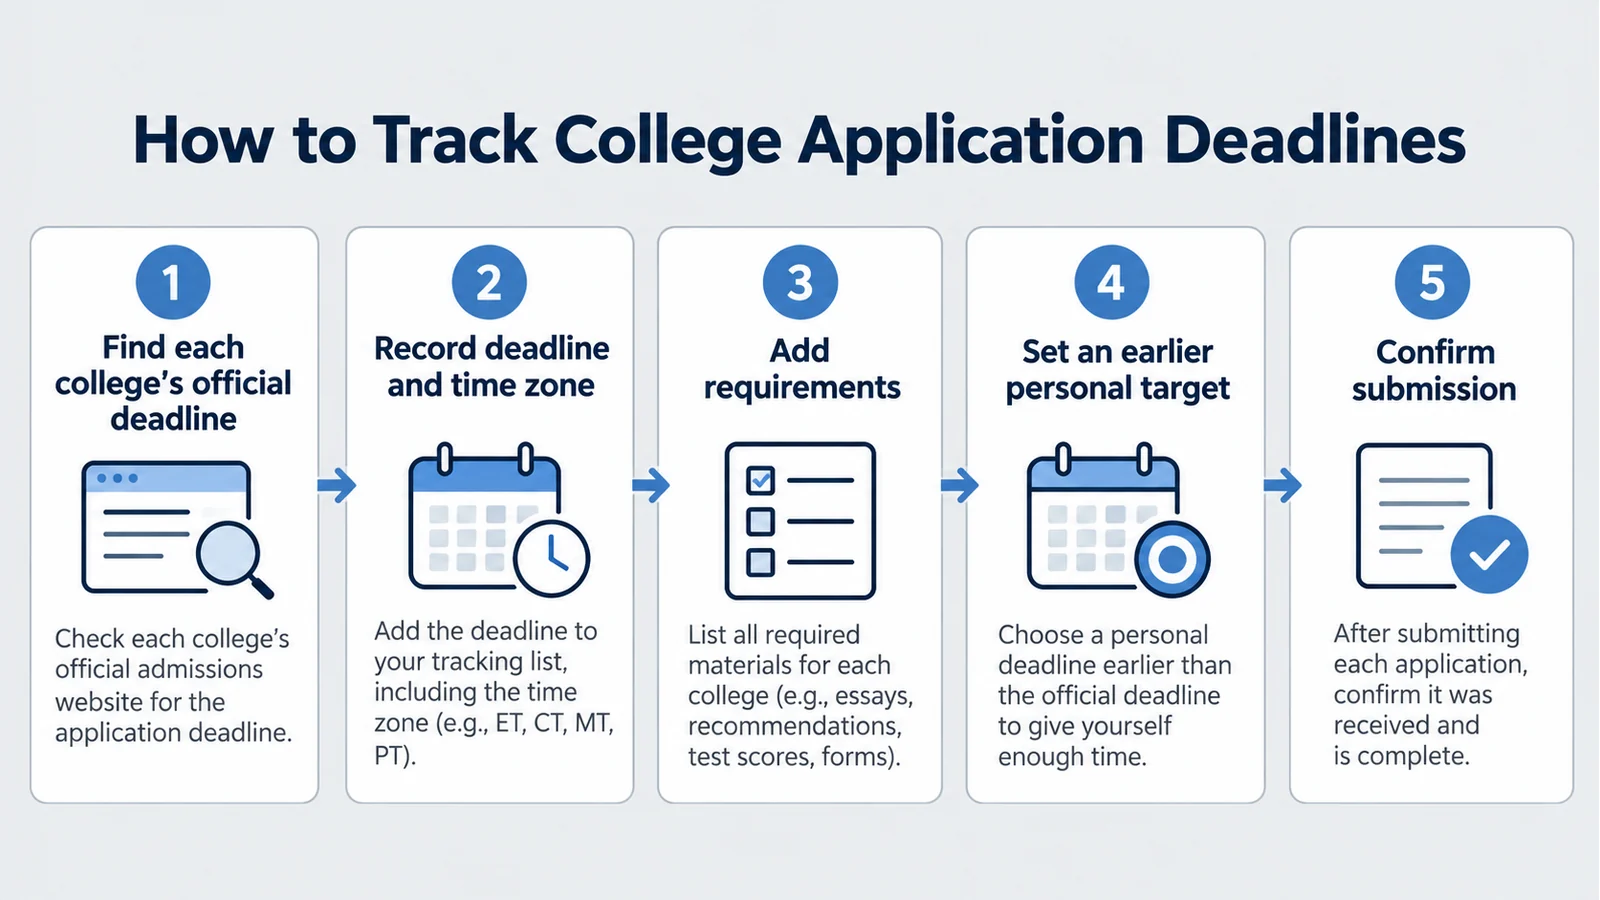
- Find the official deadline. Save the admissions page link and note the date, plan, and term.
- Add the time-zone rule. If the school gives a specific time or deadline format, copy it into your notes.
- List every requirement. Separate the main application from supplements, recommendations, transcripts, test scores, portfolios, and separate financial-aid tasks.
- Set an earlier personal target. Choose a date that leaves room for a technical problem, a missing recommendation, or one more careful review.
- Confirm submission. Save the confirmation email or dashboard status, then check whether the college portal shows all required materials received.
Separate Application Work From Deadline Work
A deadline tracker should not be a second essay draft or a storage bin for every thought. Keep the tracker focused on decisions and next actions. Link out to your draft folder, recommendation request, or testing account instead of pasting long material into one crowded cell.
Make status labels specific. “In progress” is vague; “personal essay drafted,” “teacher recommendation requested,” and “college portal checked” tell you what still needs attention. Use a short list such as not started, in progress, ready to review, submitted, and confirmed.
Check requirements again after adding a college. Common App notes that colleges can set different requirements for deadlines, fees, essays, courses and grades, testing, portfolios, and recommendations. A deadline row is incomplete if it contains only the date but not the materials that must arrive with it.
Build A Weekly Deadline Review
Pick one regular review time—Sunday afternoon, a study hall, or the start of your application work session. Look at three horizons:
- This week: What can you finish or request now?
- Next two weeks: Which recommendation, transcript, or test-score task needs lead time?
- Next month: Which personal targets or official deadlines are approaching?
During the review, open the official source for any college whose deadline is near or whose requirements have changed. Do not assume a saved date is still current if the page has been updated.
For a concrete example, Yale’s official first-year timelines show separate dates for Single-Choice Early Action, QuestBridge, and Regular Decision. The lesson is not to copy Yale’s dates; it is to track the correct plan for the correct school and avoid treating “early” or “regular” as universal labels.
Use A Tool Without Giving Up Verification
The College App’s Deadline Tracker can help you organize colleges, tasks, and personal targets in one place. Use it as your planning layer, while keeping each official admissions page as the source for current requirements and dates.
If a tracker and a college website disagree, pause and resolve the conflict. Save the official page you used, record when you checked it, and ask the college’s admissions office when the instructions remain unclear. A short, precise question is better than guessing.

Do A Final Submission Check
Before you click submit, compare the application against the tracker:
- Is this the correct college, campus, term, and application plan?
- Are the main application and every required supplement complete?
- Have recommendations, transcripts, scores, and portfolios been sent through the required channels?
- Has the fee or fee-waiver step been handled?
- Did you review the final PDF or preview for missing fields and formatting errors?
- Did you save the confirmation and check the college’s portal afterward?
Start with the first college on your list today. Find its official deadline, add every required component, set a personal target earlier than the school’s date, and save the source link. Once that row is trustworthy, repeat the same process for the next college.